
Elecard ViCont — Quick Start
    | |revisiondate|: 2026-03-20 08:45:33 UTC
    | |revisionid|: bcf6ccb
1. Quick Start
Describing Software
Elecard ViCont is a solution designed for real-time control of content on screens. The software operates in the client-server mode. The client part, which is a player, gets settings from the server and plays a received stream, a playlist consisting of media files, or individual media files.
System Requirements
Player |
Server |
|---|---|
OS Linux Ubuntu 22.04 |
OS Linux + Docker |
OS Android 7+ |
ОS Linux + Docker |
Working With Server
The ViCont system is operated via a browser.
Supported browsers:
- Chromium, version 54 and later
- Google Chrome, version 54 and later
- Mozilla Firefox, version 47 and later
- Microsoft Edge, version 100 and later
For a smooth experience, make sure that your browser is updated to the latest version.
Technical Characteristics
Ubuntu-Based Players
Receiving streams
Using playlists of files
Statistics sending: over HTTP and SNMP protocols
Android-Based Players
Receiving streams
Using playlists of files
Statistics sending: over HTTP and SNMP protocols
Installing ViCont Software
Prerequisites
To install the server part, the following components are required:
Docker. On this page, select the guidelines for Docker installation based on your Linux distribution.
Tip
You may find it useful to create a group called
dockerand add users to it, so they could execute docker commands withoutsudoand password. See the full guide here.Python 3. Python is pre-installed in most Linux distributions, including Ubuntu. You can check its presence and version using the following command:
python3 --version
If Python is not installed, install it using suitable guidelines from this page.
Installing ViCont Server
Download a server installation package named in the way vicont-bundle-<version>-<tag>.tar.gz and unpack it:
tar -xzvf vicont-bundle-<version>-<tag>.tar.gz
Then go to the vicont-bundle folder:
cd vicont-bundle
Set execute permission for the installation script:
chmod +x *.sh
Run the installation script:
sudo ./deploy.sh [OPTIONS]
You can pass additional arguments in the command.
For example, the -n or --no-demo option disables the upload of demo data to the server:
sudo ./deploy.sh --no-demo
Demo data comprises a video file, an example of an editable layout (see the ViCont Layout Editor section in the User Guide for details), and the latest versions of player packages.
To print a help message about all the available options, pass the -h or --help argument.
After this, the execution of the installation script will finish.
After the installation, the web interface will be accessible at http://<server_address>:8090.
Instead of server_address, specify any of the available network interfaces.
To log in to the web interface, use the following account credentials 1:
adminAdm!nV1-NT- 1
This account cannot be deleted.
It is recommended to change the password after the first login. Next, click on the gear icon in the upper right corner of the interface and select the Server Settings item in the drop-down list. In the window that opens, specify Network interface and Port. This is an address and a port the player will be using to connect to the web server. They are used when installing the player via the web interface. If the address and the port are invalid, the player will not be able to connect to the server during installation.
Changing Server Parameters
The server package contains a hidden .env file.
It stores environment variables with assigned values, such as the port number or the log folder path.
Variables are described in the file itself in the form of comments.
You can edit the values of the variables, if necessary.
If you have done it after installing the server, run the rebuild.sh script:
sudo ./rebuild.sh
Otherwise, run deploy.sh.
Also, you can pass variable values directly when running any of the scripts:
sudo ADMIN_USERNAME=admin ADMIN_PASSWORD=admin ./rebuild.sh
or
sudo ADMIN_USERNAME=admin ADMIN_PASSWORD=admin ./deploy.sh
Updating Server
To update the server, download the server update package and unpack it in the same folder where you unpacked the initial package:
tar -xzvf vicont-bundle-<version>-<tag>.tar.gz
Go to the vicont-bundle folder containing the update package:
cd vicont-bundle
Set execute permission for the installation script:
chmod +x *.sh
Run the server update:
sudo ./deploy.sh
Note
During update, access parameters and saved database remain intact.
Since you have probably changed the user credentials after the first login, you need to edit the values of the ADMIN_USERNAME and ADMIN_PASSWORD variables before updating the server to upload the demo data successfully.
You can do it either in the .env file or in the /root/.vicont_credentials file.
Values can be passed when running the script as well (see the Changing Server Parameters section).
Note
You may skip editing the values. The server will be updated anyway, but no demo data will be uploaded.
During the update, the script checks the presence of the /root/.vicont_credentials file.
If there is no file, the script creates it using the values of the ADMIN_USERNAME and ADMIN_PASSWORD variables or the default admin and Adm!nV1-NT values, correspondingly.
The file owner is the root user.
Only this user can read and write data from and to the file.
Installing Player
You can install a player using one of the following ways:
Installation via the Web Interface
It is recommended to install a player via the server web interface. You can also download and install a player package directly on the device. This method is described in the Standalone Installation section.
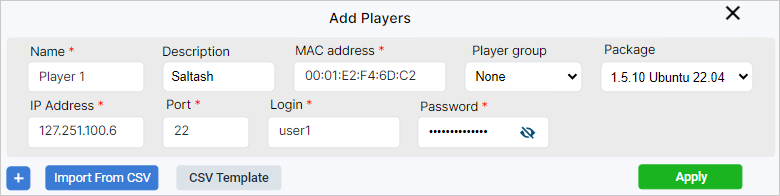
To install a new player or add an existing one without installation, go to the Players page and click the Add button. In the window that opened, you can specify parameters for adding a player or import a list of players from a CSV file.
To add a player, specify the following parameters:
Name (required) — the player name for identification.
Description — additional information about the player.
MAC address (required) — the MAC address of a network interface used by the computer on which the player will be functioning.
Group — selection of a group for adding the player. Groups are used for mass player control. In case the group is not specified, the player will be working with individual settings.
Package — selection of the player package version if you need to install a new player. Otherwise, leave the Without install value in the field.
If you need to install a new Ubuntu-based player, also specify the following:
IP Address and Port (required) — data for connection to the computer over the SSH protocol. The default port is 22.
Login and Password (required) — user credentials for remote connection to the computer. Using this account, the system will boot, and the player will start.
If you need to install a new Android-based player, specify the following:
IP Address and Port (required) — the data that should be used to connect to the computer via adb. The default port is 5555.
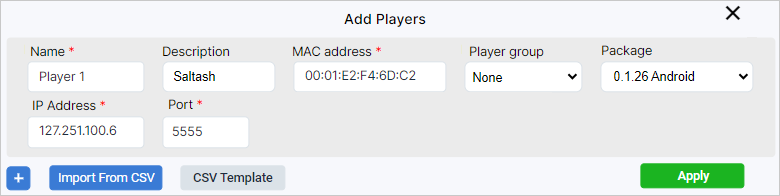
After setting all the parameters, click the Apply button.
Warning
On-player content playback may not work properly due to the possible time difference between a player and a server. To solve this issue, connect your device that the player is installed on to the Internet or—in case you have access to a local network only—manually set the time on said device or connect it to an NTP server.
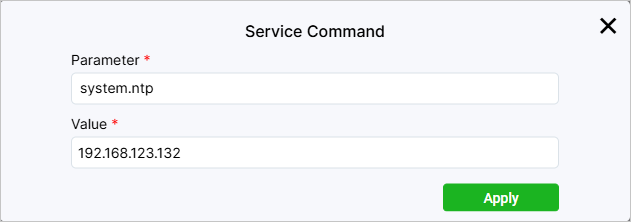
To establish synchronization via NTP, set up an NTP server and connect your player to it. To do the latter, first access the Players page via the sidebar to the left. Then tick the checkbox next to the corresponding player. This will cause buttons to appear in the top panel—click on Command. Next, fill out the Parameter and Value fields in the opened window: Enter system.ntp as the parameter and the address of your NTP server as the value. Finally, click on Apply.
You can add multiple players at a time, using a special template form in the CSV format. To download the form, click the CSV Template button. Fill in the form and click the Import From CSV button. Check imported parameters and apply changes.
Attention
Only a semicolon can be used as a delimiter in the CSV file with the list of players. However, spreadsheet editors, such as LibreOffice Calc, can replace semicolons with commas during editing. If you have opened the file in an editor, make sure the correct delimiters are used. You can also specify a correct delimiter in the settings of the editor to avoid issues with delimiters.
Standalone Installation
Download the player ZIP package to the target computer. For this, click the gear icon in the upper right corner of the page and select the Player Packages section. In the opened page, select the required Ubuntu- or Android-based player package and click the appeared download icon in the Control column. You can only choose from packages that were uploaded to the server beforehand.
Hint
Upon launching an Ubuntu- or Andoid-based player, you may encounter a black screen. This is due to the fact that no content was set for playback. To fix this, assign a source of content—such as a schedule—to the player.
Players installed in the standalone mode can be added in the ViCont web interface via the Players ➝ Unregistered players tab.
Installing an Ubuntu-Based Player
Note
To install a player in the standalone mode, the user should have the sudo privileges.
Extract files from the downloaded ZIP archive with an Ubuntu-based player to a folder of your choice:
unzip <archive_name>The archive contains the following files:
Installation guide (readme)
Configuration file (config.json)
An archive with the player package (tar.gz)
Installation file (install)
Go to the
config.jsonfile and check that the ViCont server address is correct:{ "server": { "address": "127.0.0.1", "port": 8090 } }
Specify a real IP address in the
addressstring and a real port number in theportstring.Run the player installation from the user having sudo privileges.
Warning
If you fail to run the following command:
Double-check that a monitor is connected to the device
Ensure the Internet connection is established for the playback libraries to be automatically installed
sudo ./install -p <path_to_player_package> -u <username>
Specify the actual values instead of <path_to_player_package> and <username>, for example:
sudo ./install -p ./Elecard.Player-1.2.9.tar.gz -u user
Then reboot the computer:
sudo reboot
Following the reboot, the player will automatically start up, connect to the server, and begin streaming live content or playing files according to a playlist. When there are no available streams or files, the player will display a black screen.
Installing an Android-Based Player
An Android-based player comes in the form of an APK package. There are two methods to install it.
Method 1: using the adb tool
Extract files from the downloaded ZIP archive with the Android-based player to a folder of your choice.
The archive comprises the following files:
Player installation guide (readme)
An archive with the player APK package (tar.gz)
Unpack the tar.gz archive with the player package.
Activate Developer options on the Android device.
If you don’t have the adb tool on your computer, download it. Open the link, go to the Downloads section, and select a version that is suitable for your computer. Click the name of the chosen version to download a ZIP archive with adb.
Unpack the archive in a folder on the computer and go to this folder using the terminal.
Connect to the Android device:
adb connect <Android_device_IP_address>:5555
Install the player package from the archive:
adb install -t <path_to_player_package>
Instead of <path_to_player_package> specify a path to the installed package, for example:
adb install -t Elecard.Player-0.3.19.apkRun the player:
adb shell am start -n com.elecard.vicont.player/com.elecard.vicont.player.MainActivity
Method 2: installing directly on the device
Download, unpack and install the player package (APK) directly on the Android device.
Run the player by clicking the Vicont Player icon.
When you first run an Android-based player installed in the standalone mode, you will see a form where you need to enter the address and the port of the server. Enter the address and the port and click CONNECT.

Warning
If no form popped up, it means that the player sent a request to the wrong address. To fix this, do one of the following:
Press the
 → 1 → 3 → 6 buttons on your Android device’s remote control one by one—this should cause the form for entering the address to appear
If the player is connected to the Internet, you can contact the Elecard Technical Support Team and share your server’s local address to be redirected.
If you chose to install the player via adb, you can avoid this form entirely by laucnhing the player via the following command:
adb shell am start -n com.elecard.vicont.player/com.elecard.vicont.player.MainActivity -e serverAddress "http://<server address>:8090"
Adding new users
To add a new user, click the gear icon in the upper right corner of the page and select the Users section. On the opened page, click the Add button. Specify the user name and role, as well as the password to access the system. You can add users with the following roles:
Guest — a read-only access providing the ability to view all information without the possibility to make any changes. This role doesn’t allow changing user credentials.
Operator — full access to the system without the possibility to work with users.
Administrator — full access to the system with the possibility to add or delete users.
As you specify all fields, click the Add button. A new user will be added to the system and appear on the page. If required, you can change the user credentials and(or) role even after the user has been added. Further, send the credentials to the user.